Understanding the Importance of Teeth Whitening in Photoshop CC
In the world of digital photography and photo editing, the ability to enhance and perfect images is paramount. One of the most sought-after enhancements is teeth whitening. Photoshop CC offers a powerful suite of tools that allows you to subtly or dramatically whiten teeth in your photos, creating more polished and professional-looking images. This capability is not just for cosmetic purposes; it significantly impacts the overall visual appeal and can be a crucial skill for photographers, retouchers, and anyone looking to elevate their portraits and other types of imagery.
Why Whiten Teeth in Photoshop CC?
Teeth whitening in Photoshop CC serves multiple purposes, extending beyond mere aesthetics. Discoloration of teeth can be caused by various factors, including coffee, tea, smoking, and natural aging. These factors can detract from the overall look of a photograph, making subjects appear older or less healthy. Photoshop CC provides a convenient and effective solution to this issue, allowing you to correct these imperfections swiftly and efficiently.
Enhancing Portraits

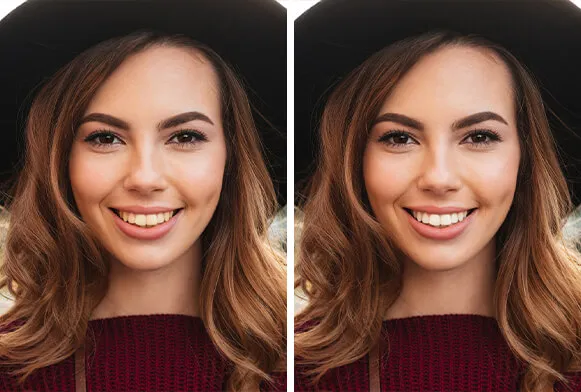
In portrait photography, the subject’s teeth are often a focal point. Whitening teeth can immediately improve the overall impression of a portrait, making the subject appear more vibrant, youthful, and healthy. Clean, white teeth contribute significantly to a positive first impression and can enhance the emotional impact of the photograph, making it more appealing.
Improving Overall Aesthetics
Beyond portraits, teeth whitening can improve the overall aesthetic of various images, including product shots, group photos, and even images used for marketing and advertising. In professional contexts, this seemingly minor adjustment can make a significant difference, presenting a more polished and professional image. The subtle improvements can create a more positive perception of the subject or product.
Essential Tools for Teeth Whitening in Photoshop CC
Photoshop CC offers several tools and techniques for whitening teeth, each serving a specific purpose and catering to different levels of editing proficiency. The key to successful teeth whitening lies in using the right tools and understanding how they interact with each other. This section will explore the primary tools you will use in Photoshop CC to perform teeth whitening, ensuring that you can achieve the desired result.
Using the Lasso Tool and Quick Selection Tool

The Lasso Tool and Quick Selection Tool are fundamental for creating precise selections in Photoshop CC. These tools enable you to isolate the teeth, which is the first and most critical step in the teeth whitening process. The Lasso Tool provides a freehand selection, allowing you to trace the contours of the teeth manually. The Quick Selection Tool, on the other hand, uses smart technology to detect edges, significantly speeding up the selection process.
Refining Selections for Precision
Regardless of the selection method used, refining the selection is essential to ensure accurate results. This is where the Refine Edge tool comes into play. By accessing this tool, you can smooth the edges of your selection, add a feather to soften the transition, and even adjust the selection to include or exclude specific areas. These refinements are crucial for avoiding a harsh, unnatural look.
Employing the Adjustment Layers
Adjustment layers are non-destructive editing tools that allow you to make color and tone adjustments without directly altering the original image. They are an indispensable part of any teeth whitening workflow, providing flexibility and control. This section will discuss how to use Brightness/Contrast and Hue/Saturation adjustment layers for precise and controlled teeth whitening.
Brightness/Contrast Adjustment

The Brightness/Contrast adjustment layer is a straightforward tool for increasing or decreasing the overall brightness and contrast of the selected area. When used for teeth whitening, a slight increase in brightness can lighten the teeth, while adjusting the contrast can enhance the whiteness. The key is to make subtle adjustments and monitor the result, so you do not over-whiten.
Hue/Saturation Adjustment
The Hue/Saturation adjustment layer provides more control over the color of the teeth. By decreasing the saturation, you can reduce the yellow tones and make the teeth appear whiter. The Hue slider can also be used to slightly adjust the color, moving the teeth away from any unwanted yellowish hues. Again, use this tool with caution and make small adjustments to maintain a natural look.
The Step-by-Step Guide to Instant Teeth Whitening
Now, let’s dive into the step-by-step process of whitening teeth in Photoshop CC. This detailed guide will take you through each stage, from making the initial selection to applying the final touches, ensuring you achieve professional-looking results.
Step 1 Creating a Selection of the Teeth

The first step is to isolate the teeth. This requires precision and accuracy. Using either the Lasso Tool or the Quick Selection Tool, carefully trace the outline of the teeth, ensuring you include the full surface area of each tooth without including the surrounding gums or the shadows. The accuracy of your selection directly impacts the outcome, so take your time and work meticulously.
Using the Lasso Tool
The Lasso Tool is best suited for making precise selections, especially in situations where the edges of the teeth are clearly defined. Click and drag the tool around the teeth, carefully following the contours to create a closed path. Practice is the key to mastering the Lasso Tool, and with each attempt, your selection will become more refined.
Using the Quick Selection Tool
The Quick Selection Tool is often quicker and more efficient, especially when the teeth are distinct from the background. Click and drag the tool over the teeth, and it will automatically detect and select the edges. If the selection extends beyond the teeth, use the Alt/Option key to subtract from the selection. This tool is ideal for speeding up the process.
Step 2 Refining the Selection

Once the initial selection is made, the next step is to refine it to ensure accuracy. This is critical for preventing unwanted artifacts or a patchy look. You can do this using the Select and Mask feature, which enables you to smooth the edges, add a feather, and adjust the selection to precisely match the teeth.
Adjusting the Edges
In the Select and Mask workspace, you can adjust the edges of your selection to fine-tune its fit. Smoothing the edges softens the transition, while feathering creates a gradual blend between the selected area and the surrounding pixels. These adjustments help to prevent harsh lines and create a more natural appearance.
Step 3 Applying the Adjustment Layers
With the selection refined, the next step is to apply the adjustment layers. Click on the Adjustment Layer icon at the bottom of the Layers panel and select either Brightness/Contrast or Hue/Saturation. These layers will only affect the selected area, so your adjustments will be limited to the teeth. This is where the actual teeth whitening takes place.
Brightness/Contrast Adjustment

In the Brightness/Contrast adjustment layer, slightly increase the brightness to lighten the teeth. Then, adjust the contrast to enhance the whiteness. Be careful not to overdo it; a subtle change is often more effective than a dramatic one. Regularly check the image and evaluate the results.
Hue/Saturation Adjustment
In the Hue/Saturation adjustment layer, decrease the Saturation to remove the yellow tones. You might also want to use the Hue slider to correct any lingering yellow hues. The goal is to achieve a natural, bright white look, avoiding any unnatural tints.
Step 4 Fine-Tuning and Finishing Touches
After applying the adjustment layers, fine-tuning is essential. This ensures that your work looks both natural and polished. Adjusting the opacity and blending modes allows you to control the intensity of the effect and seamlessly integrate the changes with the original image.
Adjusting Opacity and Blending Modes

The opacity of the adjustment layers controls how much of the effect is applied. Reduce the opacity if the whitening appears too strong. You can also experiment with blending modes, such as Soft Light or Overlay, to refine the effect and achieve a more natural look. These final touches are what differentiate an amateur job from professional-level retouching.
Common Mistakes and How to Avoid Them
Even experienced photo editors can make mistakes. Understanding these common pitfalls will help you improve your technique. This section covers the most frequent errors and how to avoid them.
Over-Whitening and Unnatural Results
One of the most common mistakes is over-whitening. The result is an unnatural, artificial look that can detract from the image. To avoid this, use small, incremental adjustments and regularly check your work. Focus on achieving a subtle brightening effect, rather than aiming for pure white teeth. A natural appearance is more appealing.
Ignoring the Surrounding Elements
Another common mistake is ignoring the surrounding elements. Be mindful of how the changes to the teeth affect the overall image. If the teeth become too bright, they may draw undue attention, and the image loses its balance. Pay attention to any color casts that may appear on the gums and adjust accordingly. A holistic approach is crucial for professional results.
Optimizing Workflow and Saving Time
Efficient workflow and time-saving techniques are crucial for achieving high-quality results without wasting time. This section will present tips and tricks that will help you optimize your teeth-whitening process.
Teeth whitening in Photoshop CC is a valuable skill that can significantly enhance your photos. By mastering the essential tools and techniques, you can achieve natural-looking results. With practice and attention to detail, you can quickly transform your images. So, the next time you are editing a portrait, remember these tips and enjoy the process!